Previously, I’ve posted about the 2013 2014 2015 Lightroom calendar template files that are used to create personal calendars using Lightrooms Print module. This post will walk you through the structure of the fully layered calendar template files and how you go about to modify them.
Previous years (before 2013), the package contained one psd-file for each month, each with different layer groups containing the specific texts for each language. This was rather cumbersome to maintain and modify. If you wanted to change the font for a text, this had to be done in each file, i.e. 12 times. So more advanced changes in the templates could give you much repetitive work. Not to mention the work needed to be done by me to create new templates for each new year…
Enter Photoshop variables and data sets
The versions from 2013 and forward uses Photoshop variables and different variable sets. In short, each text layer is defined with a variable and by using different data sets it is possible to change the text content for each text layer dynamically. The data sets can also control if different layers should be visible or not. So for each month, in each language, there is a different data set defined, setting the month text, all the days names, each individual date, the week numbers, etc and also showing the correct background area to match and gray out the previous and following months.
By using variables and data sets you can use the same basic master file (Lightroom calendar templates), and create different output files for each language and each month by applying different data sets. To modify the look of the template, the modification only needs to be done once in the master file. After that the new templates can be “generated” using the data sets. More on that a little later.
I’ve linked to some basic information/tutorials on Photoshop variables and data sets further down for reference.
Template file layers
But first, let us look into the different layers in the fully layered template file.
Starting from the top:
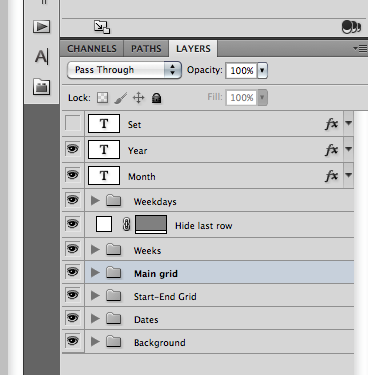
- Set – This is a hidden layer holding the data set name. It should always be hidden, so no modification of this is ever needed. It is needed as a placeholder when loading data sets from a file.
- Year – Holds the year text (‘2013’, ‘2014’ depending on year)
- Month – Holds the main month text (‘January’, ‘February’, etc depending on language)
- Weekdays – A layer group that holds the individual layers in the top row holding the weekday texts (Monday, Tuesday, etc)
- Hide last row – Most months only contain dates during five consecutive weeks, but some have dates during six weeks. This layer holds a vector mask that hides the bottom rows information (week number, dates, grid, etc). So for most weeks this layer is visible, but for months with six weeks, it is hidden. This layer is displayed and hidden using variables and information in the data sets.
- Weeks – A layer group holding the week number texts on the left. If you do not wish to show these, just hide this group in your master file.
- Main grid – Holds a number of vector mask layers (with a 2 px stroke in it’s layer style) that makes up the main grid in the calendar. Not very pretty, but it gets the end result done.
- Start-End Grid – A layer group that holds vector mask layers that gives the background colors for the weekends as well as the background color for dates in the preceding and following months. These areas will shift depending on the number of days in the month and when the month starts. There are different layer groups defined for all needed combinations; 28 day month starting on a Friday (Fri-28), 30 day month starting on a Saturday (Sat-30), etc. These are displayed and hidden using variables and information in the data sets.
- Dates – A layer group containing one text layer for each date in the calendar grid. The actual text in each layer is controlled by the data sets.
- Background – Sets the main background color and contains additional vector masks to control the area and background color for the shadings behind the week numbers, week days and the top month text areas.
General update process
The main idea is that you should not need to change/update the actual texts in the template. See these as placeholders for the text with an example month to start out with. Do any layout changes (change fonts, move the texts, change colors, change text size, add your own logo layer, etc) with the example month as reference. You will then generate all the twelve templates files (one for each month) using the data sets that is included in the template file. When doing this, Photoshop will replace the example texts so that the correct dates, month text, etc are displayed.
Making adjustments
You can make just about any modification to the calendar template file, as long as you
- keep all the text layers
- keep all the layers in the “Start-End Grid” group
- keep the “Hide last row” layer
- Don’t rename any of the above layers
Apart from that you can change fonts, texts sizes, move around the texts, change colours, add new layers (not using the same layer name as the above mentioned layers), add layer styles, etc.
If you change the date and/or week number texts (font, size, colour, etc), don’t forget the sixth week! A good idea is to hide the “Hide last row” layer when modifying the master file to display these when working. You do not need to worry about the actual texts (month, weekdays, dates, etc). These will be changed when we apply the data sets.
I would recommend that you create a copy of the master file before starting with the modifications.
Applying the data sets
For the included languages, the calendar template already contains all the data sets needed for 2013. So there is no need to define any variables or data sets , that has already been done.
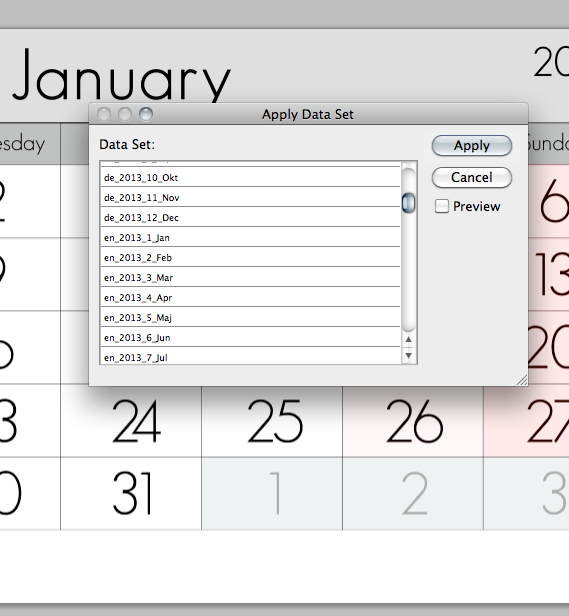
To try out your modified template, select Image -> Apply Data Set…
- Select the data set you would like to apply. They are clearly labeled with the language ISO code, year, and month. Either select “Preview” (to keep the “Apply Data Set” window open) or “Apply”. Warning: Photoshop will go through some mayor spasms for 20-30 sec while applying the data set (for Photoshop CC even longer). Don’t worry. It’s suppose to do this, it will pass…
When Photoshop settles, the week days and month should be set according to the selected language and all dates and background colors should be set according to the month.
Saving new template files
When you are content with your modifications and have applied the first data set (January for a specific language presumably) it is time to save your template for that month.
- First save your new modified master file, for example to “My 2013 calendar layout master.psd”. You can create as many different layout masters as you wish.
- Go through and apply the data sets for each month in your preferred language and save (“Save as”) a template file for each month. This can be as a jpg-file or a psd-file, both will work in Lightroom.
Exporting data sets
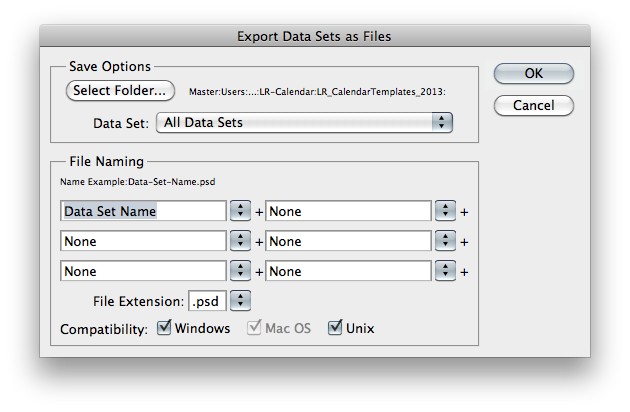
An alternative to manually apply and save each data sets you can use the “Export” function. Select File -> Export -> Data Sets as Files…
This will give you the option to export a single Data set (select in the drop down list) or all existing data sets in the master file (the main master file contains 11 12 languages with 12 months each which will result in 136 144 different template files).
Select a destination folder, set a naming schema (using the data set name is a good start) and hit ok.
I have noticed that exporting to psd files results in files that can’t be read by Lightroom directly. You will need to reopen and resave them in Photoshop before importing them into Lightroom. This has to do with the compatibility mode used in the Photoshops export function.
Removing data sets to simplify export
You are probably not interested in all the languages that have been defined in the original master file’s data sets. If you want to use the “All Data Sets” option when exporting and not have to wait while exporting and then delete the majority of resulting template files, you can delete data sets that are not of interest for you.
You can remove datasets by selecting Image -> Variables -> Data sets…
- Select the data set you wish to remove and hit the trashcan to the right of the drop down list. I you need to undo, use the History panel…
Removing none necessary data sets will reduce the export time when using the export “All Data Sets” option.
You can even define new languages in the Data Sets window. Select a data set to create a new set from, hit the disk icon (create new data set from selected) to the right of the Data Set drop down list and then edit the variable values. Make sure you create new data sets using existing data sets representing each month. For each month you will need to update the ‘Month’ variable and each of the weekday variables (‘Mon’, ‘Tue’, ‘Wed’, etc).
For more information on Photoshop variables and data sets:
Layers Magazine: Adobe Photoshop Variables (Video with Dave Cross)
hola me gustaria actualizaras calendario 2016 de dos meses juntos
Gracias/ thank you¡¡¡¡
Thank you!
Thank you for sharing your work and explanations for free. In a very special way thanks for including the translation into the Catalan language
Thank you, really useful, but sorry, I am not a fan of the font you are using on these pages, I find it very difficult to read. I have had to copy and paste.
Hi Clive. Yes, I’m aware of the font-issue and have thought of changing at some point. We will see when I get the time…
Thank you so much for sharing this calendar and your explanations.
Best regards.